The useEffect hook is one of the most powerful and versatile tools in the React developer's toolbox. It allows you to manage side-effects in your functional components and keep your code clean, organized, and performant.
In this blog, we'll take a deep dive into the useEffect hook, covering everything from the basics of how it works to more advanced topics like handling dependencies and cleaning up effects.
It is recommended to read the previous blog on useState before reading this one, as it provides a great foundation for understanding how the useEffect hook works in relation to state. We'll also provide real-world examples and explanations to help you master this essential tool and improve the performance of your React applications.
What are going to cover?
Side-effects
useEffect (ofcourse)
Dependency Array
Cleanup functions for useEffects
What are side-effects?
You need to first understand what are the side-effects. We can say that if function is changing some state outside the local environment we can say that its a side-effect.
Examples of such side-effects are,
Performing I/O
Fetching data from server or API
Modifying a non-local variable and modifying a static local variable
Third-party widgets, network
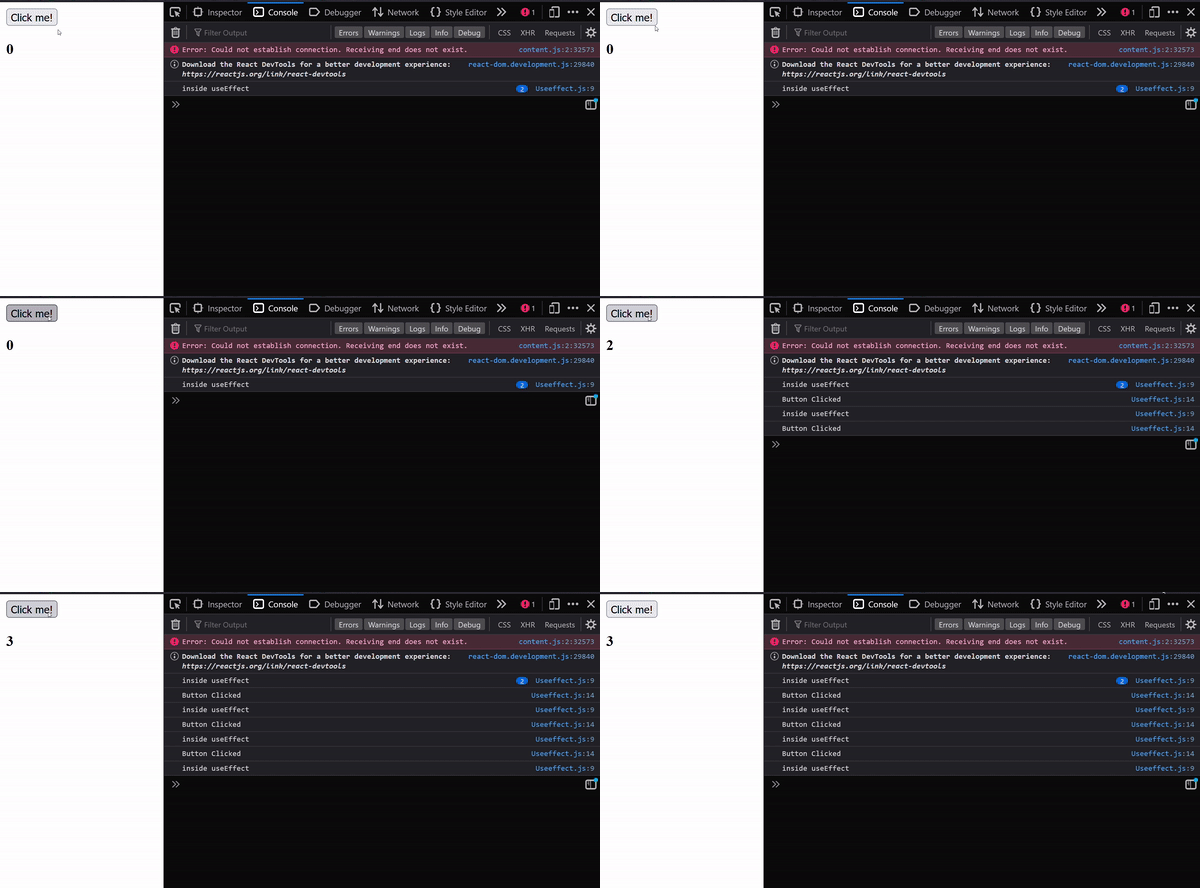
So, useEffect or just Effect is useful for handling such side-effects. It runs at the end of rendering as its right to to synchronize our component to the outside system.
We use the useEffect as follows:
  useEffect(()=>{

    //Run side effects here

  }, [
    //This is a dependency array
    //This is optional
  ])
Let’s look at one example:
This is a simple counter component, we are incrementing the counter on each button clicked. After each button clicked the useEffect will re-render the component.
const Useeffect = () => {
  const [counter, setCounter] = useState(0);

  useEffect(()=>{
    console.log("inside useEffect")
    //This will rerender after each button click.
  })

  const handleOnClick=()=>{
    console.log("Button Clicked")
    setCounter(counter+1);

  }
  return (
    <div>
      <button onClick={handleOnClick} >Click me!</button>
      <h3>{counter}</h3>
    </div>
  )
}

Now, we want to add a functionality to change the background color of the document in this component only. The code will look like:
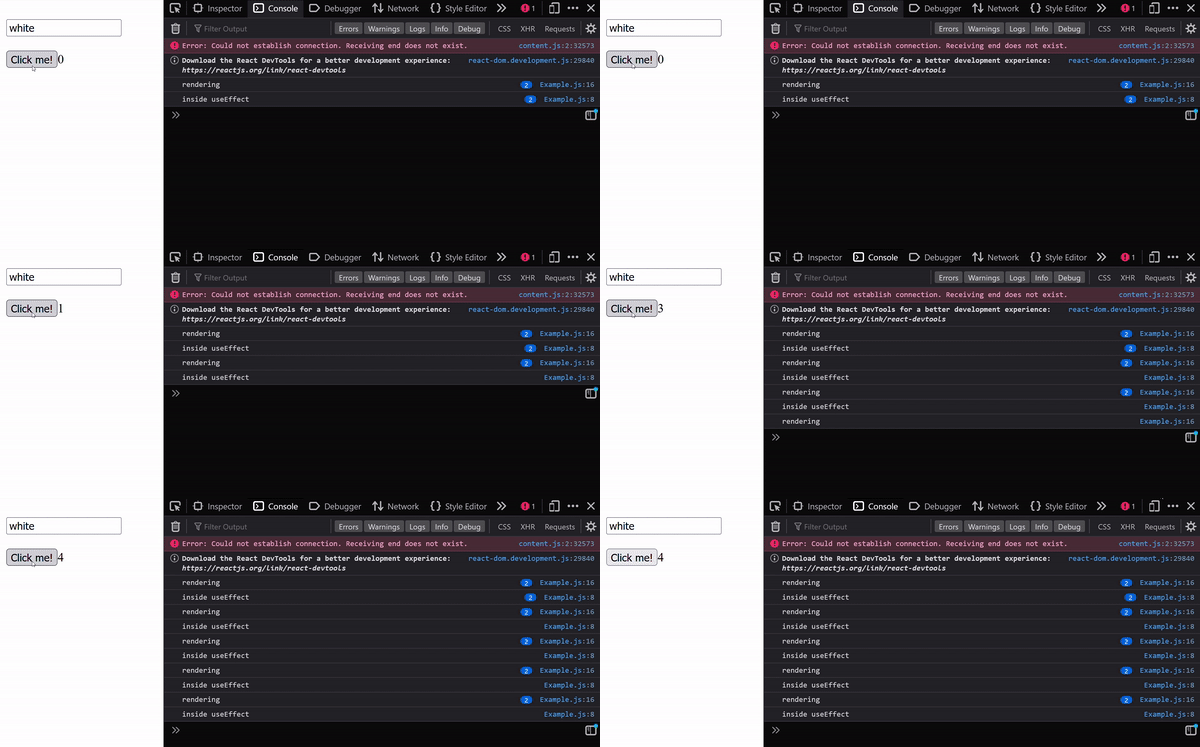
Initially, the background color has been set to white. When the user inputs a color, the background color changes. However, even when the counter is incremented, the useEffect hook still runs, and this is because we have not specified a dependency array for the hook.
const Example = () => {
  const [color, setColor] = useState("white");
  const [counter, setCounter] = useState(0);

  useEffect(() => {
    console.log("inside useEffect")
    document.body.style.backgroundColor = color;
  });

  const handleOnClick = (e) => {
    e.preventDefault()
    setCounter(counter+1)
  };
  console.log("rendering")

  return (
    <div>
      <input
        type="text"
        onChange={(e) => {
          setColor(e.target.value);
        }}
        name="color"
        value={color}
      />
      <br style={{margin:20}}/>
      <button onClick={handleOnClick}>Click me!</button>
      <label>{counter}</label>
    </div>
  );
};

What is Dependency Array?
A dependency array is a list of state variables or functions that the useEffect hook is dependent on. Whenever these values change, the useEffect callback function is triggered. By using a dependency array, we can prevent excessive re-rendering of components, making the code more efficient.
useEffect(callback, dependency array)
Now, let’s add a dependency array in above code:
const Example = () => {
  const [color, setColor] = useState("white");
  const [counter, setCounter] = useState(0);

  //This is useEffect for changes the color of document
  useEffect(() => {
    console.log("inside useEffect1")
    document.body.style.backgroundColor = color;
  },[color]);
  //Here in the dependency array we have added the color state varaible
  //Whenever the color state changes then only this useEffect will run

  //In this useEffect we did not provide any depencency array
  useEffect(() => {
    console.log("inside useEffect2")
  });

  const handleOnClick = (e) => {
    e.preventDefault()
    setCounter(counter+1)
  };
  console.log("rendering")

  return (
    <div>
      <input
        type="text"
        onChange={(e) => {
          setColor(e.target.value);
        }}
        name="color"
        value={color}
      />
      <br style={{margin:20}}/>
      <button onClick={handleOnClick}>Click me!</button>
      <label>{counter}</label>
    </div>
  );
};

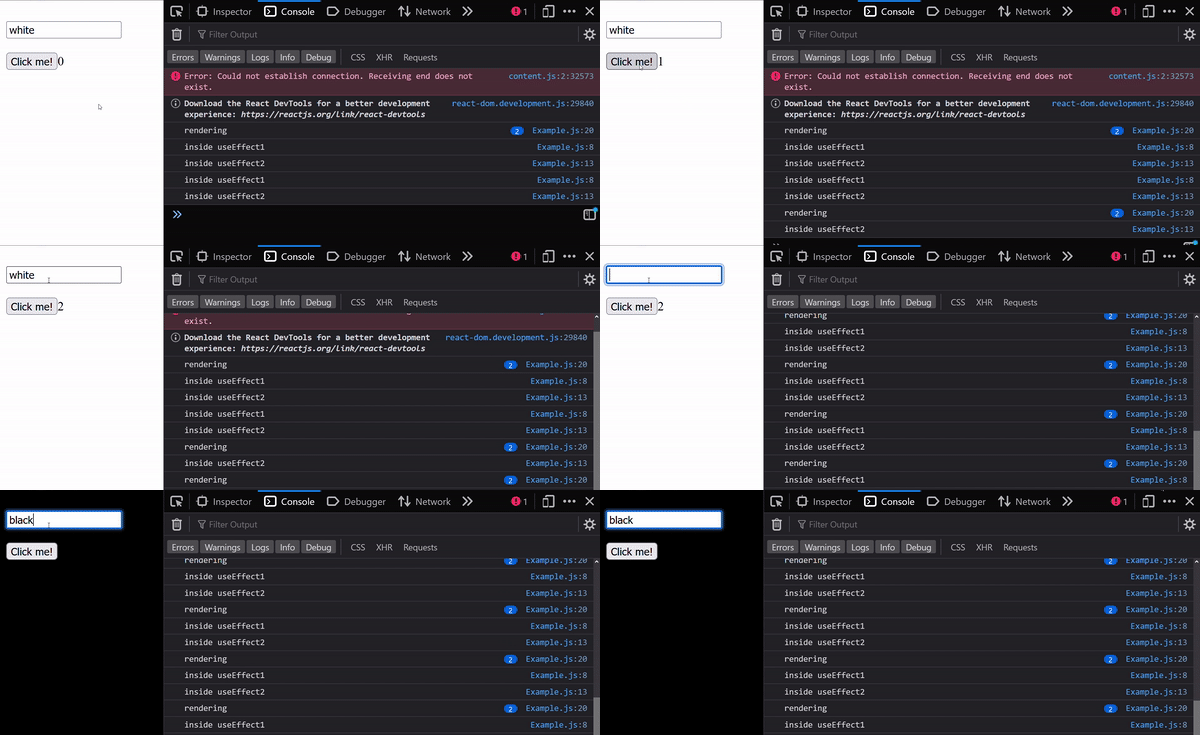
As, we can see only 2nd useEffect inside the will get invoked when we click on button and 1st useEffect whenever there is change in the input i.e. changes in color state.
But what if the component does not depend on any state, we pass an empty array as dependency array. This will tell useEffect to run only one time. Example of this can be a fetching data from the API.
useEffect(() => {
    fetch("https://jsonplaceholder.typicode.com/users")
}, []);
This will fetch data from the API using one call only.
The useEffect Cleanup Function
It’s important to note that the useEffect hook will run on every render by default. For example, if data is being fetched from an API while the user navigates to a different page, the fetching will still occur even though it's no longer needed. We need to abort it. This abort can be done by using AbortController.
As per React documentation, React will perform the clean up as the component gets unmount. But,
useEffectsrun for every render and not just once. This is why React also cleans up effects from the previous render before running the effects next time.
The code will look like:
useEffect(() => {
  effect
  return () => {
    cleanup
  }
}, [input])
Let’s looks at example on how to implement the cleanup function.
  useEffect(() => {
    const controller = new AbortController();
    //AbortController is a simple object
    //that generates an 'abort' event on its 'signal' property
    //when the abort() method is called.
    const signal = controller.signal;

    //We can pass this sinal as a option to the 'fetch',
    //it will listen to it and we can abort the fetch request
     fetch("https://jsonplaceholder.typicode.com/users", {
        signal
      })
      .then((response) => response.json())
      .then((response) => {
        // handle success
        console.log(response);
      })
      .catch((err) => {
        if (err.name === 'AbortError') {
          console.log('successfully aborted');
        } else {
          // handle error
        }
      });
    return () => {
      // cancel the request before component unmounts
      controller.abort();
    };
  }, []);
If we move to different page the abort function will get call before the component gets unmounted. As a result the state will not get updated and will not get error for the same.
So, that is it all about the useEffect. If you haven’t read the useState blog please read it by clicking here. In the next blog we will look into useContext.
Thank you for reading this article and I hope it helped you understand how to effectively use useEffect hook.
Please do follow me on LinkedIn at joshiomkar04.
